cloud-project
Project 08: Organization Case Study 1
CyberPreacher Edition
Summary
This project provides a comprehensive case study for deploying and securing an Azure environment for CyberPreacher LTD, a digital media company with distributed teams in Chicago and San Francisco. The lab guides you through reconstructing the company’s Azure infrastructure using ARM templates, configuring networking and security (including Azure Firewall, route tables, and AKS), and implementing identity and access controls with Entra ID. It also covers platform protection requirements such as antimalware deployment, JIT VM access, custom RBAC roles, and enforcing application registration and consent policies. The solution emphasizes best practices for resource management, secure access, and compliance with organizational security standards.
Compamy Overview
CyberPreacher LTD is a digital media company that has 5 employees in the Chicago area and 10 employees in the San Francisco area.
Existing Environment
CyberPreeacher LTD has an Azure subscription named Sub1 that has a Subscription ID of XXXXXXXX-XXXX-XXXXXXXX-XXXXXXXXXXXX
Sub1 is associated to an Azure Entra ID tenant named example.com. The tenant contains the user objects and the device objects of all the CyberPreacher employees and their devices. Each user is assigned an Azure entra ID Premium P2 License. Entra ID Privileged Identity Management (PIM) is activated.
The Tenant contains the groups shown in the following table.
| Name | Type | Description |
|---|---|---|
| Group1 | Security group | A group that has the Dynamic user membership type, contains all the San Francisco users, and provides access to many Entra ID applications and Azure resources. |
| Group2 | Security group | A group that has the Dynamic user membership type and contains the Chicago It team. |
The Azure Subscription contains the following Resource Groups. AZ500RG1 and AZ500RG2
| Name | Type | Description |
|---|---|---|
| VNet1 | Virtual network | VNet1 is a virtual network that contains security-sensitive IT resources. VNet1 contains three subnets named Subnet0, Subnet1, and AzureFirewallSubnet. |
| VM0 | Virtual machine | VM0 is an Azure virtual machine that runs windows server 2016 and connects to Subnet0. |
| VM1 | Virtual machine | VM1 is an Azure virtual machine that runs Windows Server 2016 and connects to Subnet0. |
| SQLDB1 | Azure SQL Database | Sqldb1 is an Azure SQL database on a SQL Database server named LitwareSQLServer1. |
| WebApp1 | Web app | WebApp1 is an azure web app that is accessible by using https://example.com |
| AZ500RG1 | Resource group | AZ500RG1 is a resource group that contains VNet1, VM0, and VM1. |
| AZ500RG2 | Resource group | AZ500RG2 is a resource group that contains shared IT resources. |
Azure Security Center is set to Free Tier.
AZ500RG1 has the following resources:
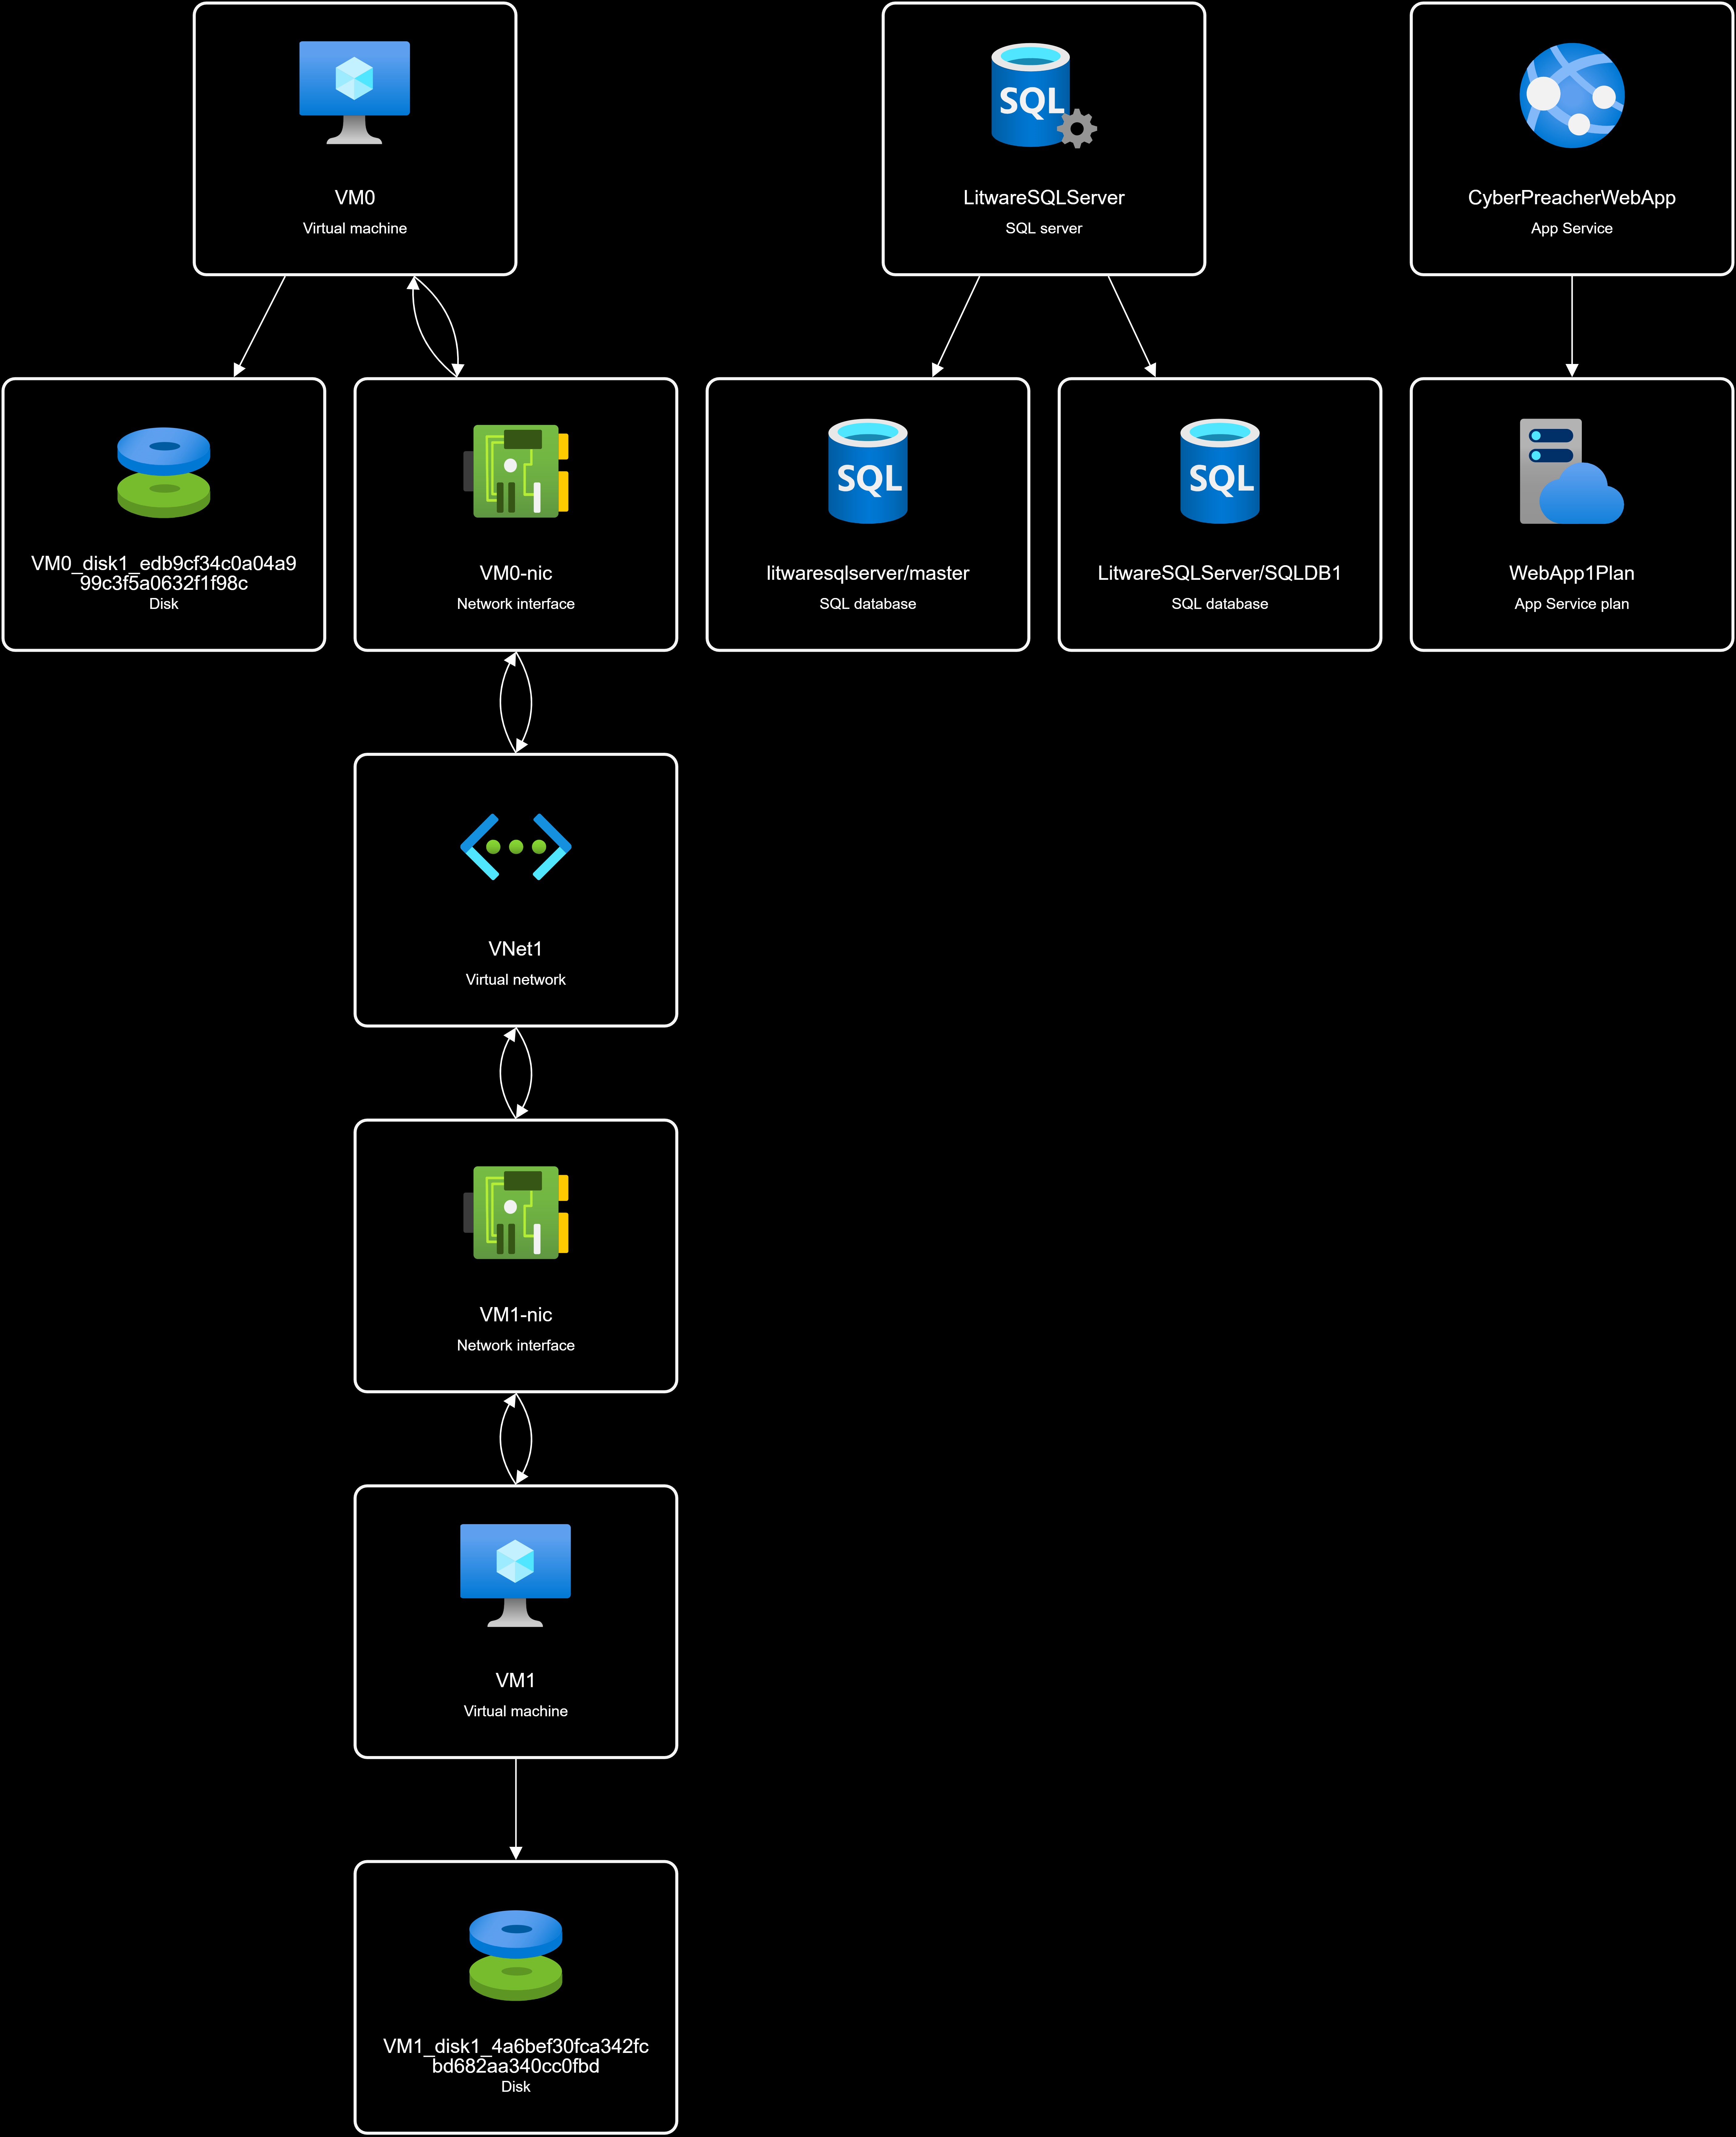
To reconstruct the environment, use the prebuilt ARM Deployment Template that I created for this Lab.
- Resource Group 1: AZ500RG1
- SQL Server: SQL-DB
- Manually create an empty Resource Group 2 named AZ500RG2.
- Bulk import Users: Users
- Create Group1 Security group in Entra ID, ensuring that it uses Dynamic User Membership based users in San Francisco.
- Create Group2 Security group in Entra ID, ensuring that it uses Dynamic User Membership based on users in Chicago.
AZ500RG2 is a resource group that contains shared IT resources.
All resources will be created in a East US 2.
Planned Changes
| Name | Type | Description |
|---|---|---|
| Firewall | Azure Firewall | An Azure Fierwall on VNET1 |
| RT1 | Route Table | A route table that will contain a route pointing to Firewall1 as the default gateway and will be assigned to Subnet0 |
| AKS1 | Azure Kubernetes Services(AKS) | A managed AKS cluster |
Identity and Access Requirement
-
All San Francisco users and their devices must be members of Group1
-
The members of Group2 must be assigned the contributor role to AZ500RG2 by using permanent eligible assignment.
-
Users must be prevented from registering applications in Entra ID and from consenting to applications that access company information on the users’ behalf.
Platform Protection Requirements
CyberPreacher LTD identifies the following platform protection requirements:
-
Microsoft Antimalware must be installed on the Virtual machines in AZ500RG1.
-
Members of Group2 must be assigned the Azure Kubernetes Service Cluster Admin Role.
-
Entra ID users must be able to authenticate to AKS1 by using their Entra ID credentials.
-
Following the implementation of the planned changes, the IT team must be able to connect to VM0 by using JIT VM access.
-
A new custom RBAC role name Role1 must be used to delegate the administration of the managed disks in AZ500RG1. Role1 must be available only for RG1
Solution
To meet planned changes, I would have to create a firewall, route table and kubernetes service
Meeting the Planned Changes requirements
Exercise 1: Deploy an Azure Firewall on VNET1
Estimated timing: 10 minutes
Step-by-Step: Deploy Azure Firewall on VNET1
- Navigate to the Azure Portal
- Go to https://portal.azure.com and sign in with your credentials.
- Open the Resource Group
- In the left menu, select Resource groups.
- Click on AZ500RG1.
- Create Azure Firewall
- Click Create > Resource.
- Search for Firewall and select Azure Firewall.
- Click Create.
- Configure Firewall Basics
- Subscription: Select your subscription.
- Resource Group: Choose AZ500RG1.
- Name: Enter a name (e.g.,
Firewall1). - Region: Select East US 2.
- Configure Firewall Settings
- Firewall management: Choose Use Firewall Policy (Create New Basic Policy).
- Virtual network: Select VNET1.
- Public IP address: Click Create new, provide a name (e.g.,
Firewall1-pip), and click OK.
- Review and Create
- Click Review + create.
- After validation, click Create.
- Verify Deployment
- Once deployment completes, go to AZ500RG1 and confirm that Firewall1 and its public IP are present.
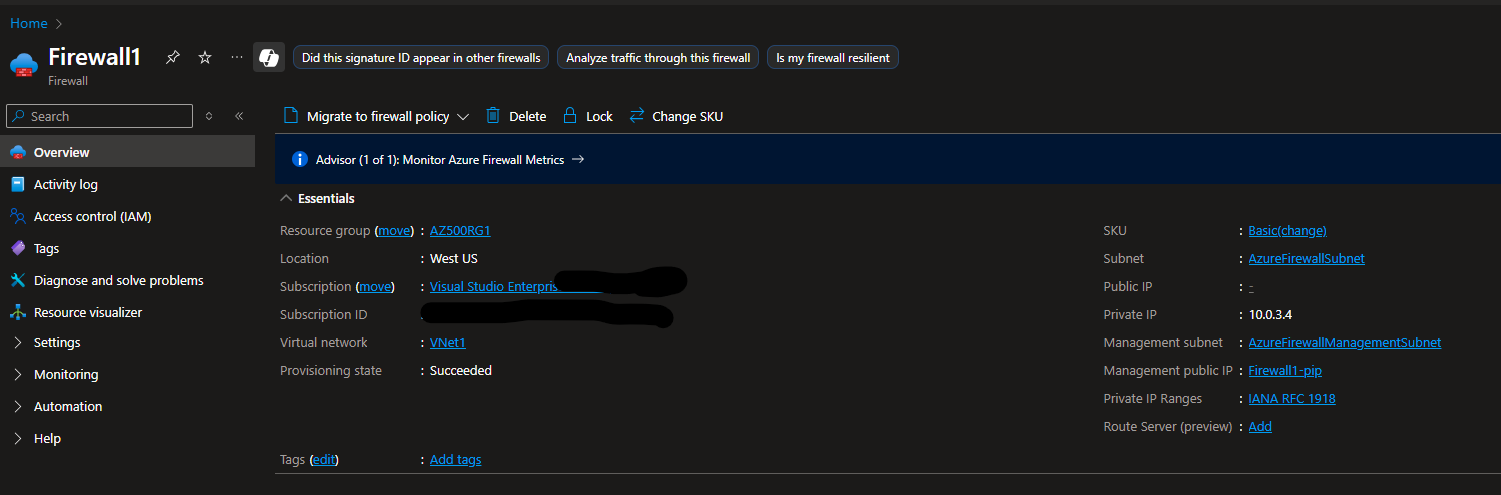
- Once deployment completes, go to AZ500RG1 and confirm that Firewall1 and its public IP are present.
- (Optional) Configure Firewall Rules
- Open Firewall1.
- Add network or application rules as needed for your environment.
Exercise 2: Create Route Table
Description: A route table that will contain a route pointing to Firewall1 as the default gateway and will be assigned to Subnet0
- Navigate to the Azure Portal
- Go to https://portal.azure.com and sign in.
- Open the Resource Group
- In the left menu, select Resource groups.
- Click on AZ500RG1.
- Create a Route Table
- Click Create > Resource.
- Search for Route Table and select it.
- Click Create.
- Configure Route Table Basics
- Subscription: Select your subscription.
- Resource Group: Choose AZ500RG1.
- Region: Select East US 2.
- Name: Enter a name (e.g.,
RT1). - Click Review + create, then Create.
- Add a Route to the Route Table
- After deployment, open the new route table (RT1).
- In the left menu, select Routes > Add.
- Route name: Enter a name (e.g.,
DefaultToFirewall). - Address prefix destination: Enter
0.0.0.0/0. - Next hop type: Select Virtual appliance.
- Next hop address: Enter the private IP address of Firewall1.
- Click Add.
- Associate Route Table with Subnet0
- In the route table (RT1), select Subnets > Associate.
- Select VNET1 and then choose Subnet0.
- Click OK to associate.
- Verify Configuration
- Confirm that RT1 is associated with Subnet0 and the route points to Firewall1 as the default gateway.
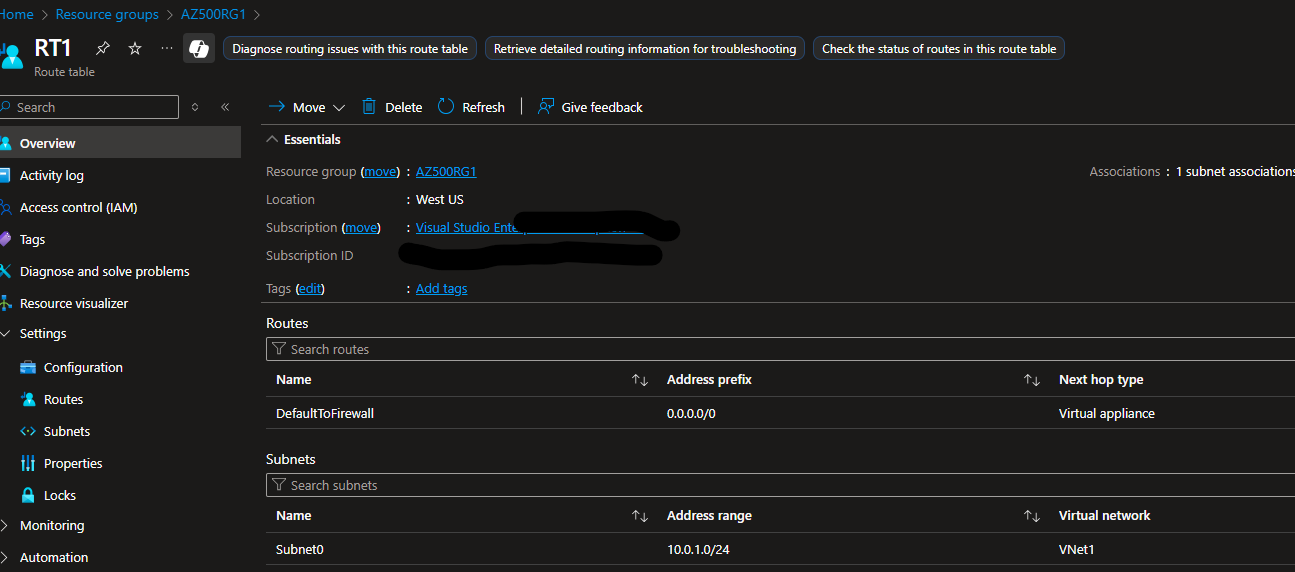
- Confirm that RT1 is associated with Subnet0 and the route points to Firewall1 as the default gateway.
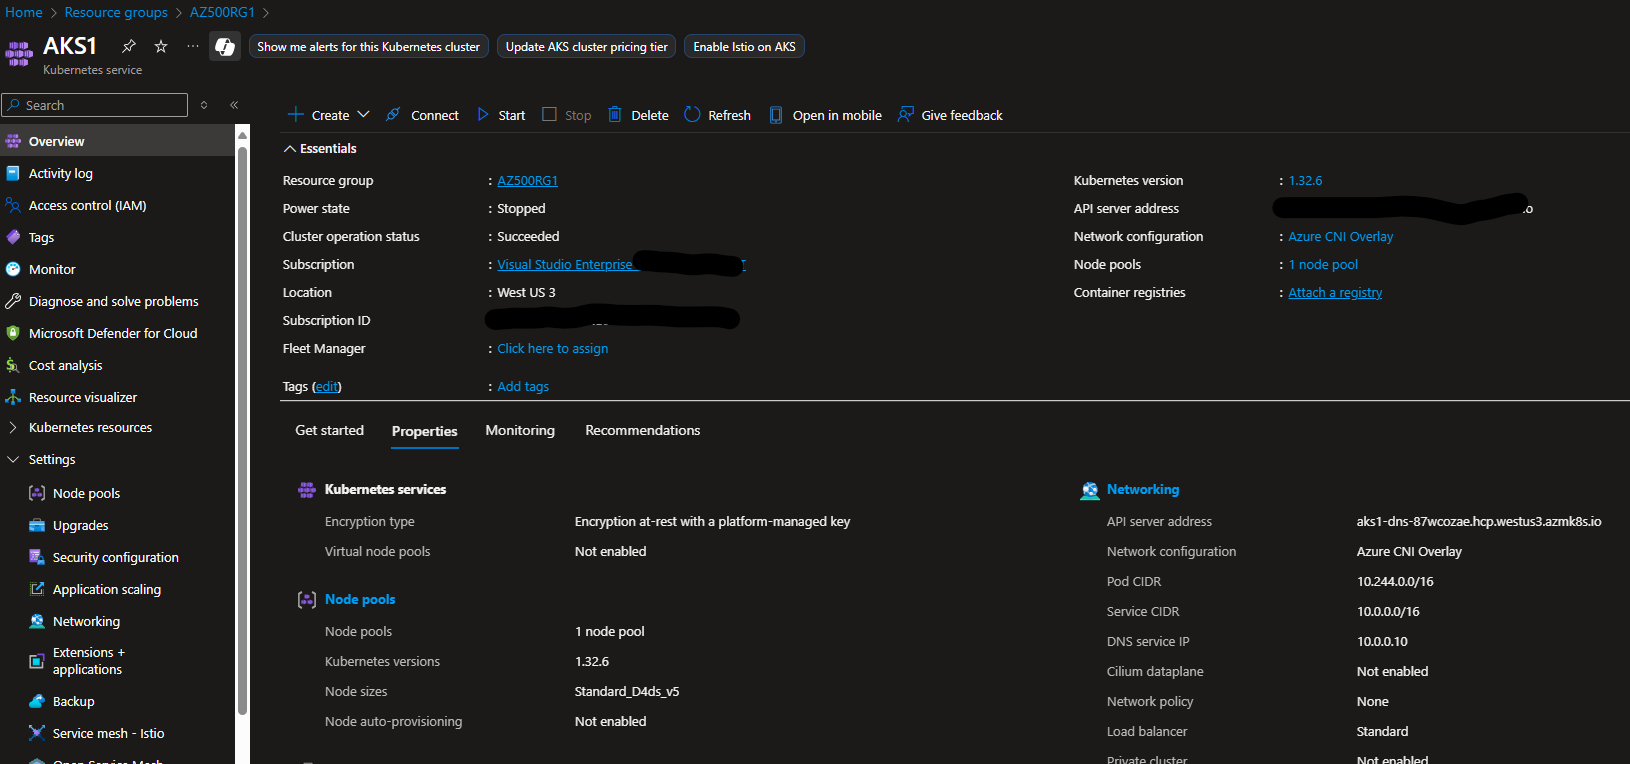
Exercise 3: Deploying Azure Kubernetes Service (AKS)
Description: A managed AKS cluster
- Navigate to the Azure Portal
- Go to https://portal.azure.com and sign in.
- Open the Resource Group
- In the left menu, select Resource groups.
- Click on AZ500RG1.
- Create AKS Cluster
- Click Create > Resource.
- Search for Kubernetes Service and select it.
- Click Create.
- Configure Basics
- Subscription: Select your subscription.
- Resource Group: Choose AZ500RG1.
- Cluster name: Enter a name (e.g.,
AKS1). - Region: Select East US 2.
- Kubernetes version: Select the default or latest available.
- Configure Authentication
- Under Authentication, select Entra ID with Azure RBAC integration.
- Choose your Entra ID tenant and configure admin and user groups as required.
Select Next.
- Configure Node Pools
- Set the Node size and Node count as needed (default values are fine for lab purposes).
- Networking
- Select Virtual network: Choose VNET1.
- Select the appropriate subnet (e.g., Subnet0).
- Review and Create
- Click Review + create.
- After validation, click Create.
- Verify Deployment
- Once deployment completes, go to AKS1 in AZ500RG1.
- Confirm the cluster is running and accessible.
- (Optional) Configure RBAC and Access
- Assign the Azure Kubernetes Service Cluster Admin Role to Group2.
- Ensure Entra ID users can authenticate to the cluster.
Meeting Identity and Access Requirement
To meet up with Identity and access requirements:
Group 1: Group type has to be changed to Assigned, then 2 new groups have to be created for dynamic users and dynamic device for group 1 members, then assign those group into Group 1.
Group 2: Assign a contributor role to AZ500RG2 on Entra ID Group2.
App Registration: Prevent users from registering application and block user consent to applications.
Exercise 1: Group 1
- Open Azure Portal
- Go to https://portal.azure.com and sign in.
- Navigate to Entra ID
- In the left menu, select Entra ID.
- Create a Dynamic User Group for San Francisco Users
- Select Groups > New group.
- Group type: Security.
- Group name: e.g.,
SF-Users. - Membership type: Dynamic User.
- Click Add dynamic query.
- Set rule to include users with
physicalDeliveryOfficeNameorcityattribute set to “San Francisco”. - Example rule syntax:
(user.city -eq "San Francisco") - Click Save > Create.
- Create a Dynamic Device Group for San Francisco Devices
- Select Groups > New group.
- Group type: Security.
- Group name: e.g.,
SF-Devices. - Membership type: Dynamic Device.
- Click Add dynamic query.
- Set rule to include devices assigned to San Francisco users (if device attributes allow).
- Example rule syntax (if using device extension attributes):
(device.extensionAttribute1 -eq "San Francisco") - Click Save > Create.
- Change Group1 from Dynamic to Assigned Type
- Select Manage > Properties
- Change Group Type from Dynamic to Assigned.
- Save changes.
- Add Dynamic Groups to Group1
- Open Group1.
- Select Members > Add members.
- Search for and add
SF-UsersandSF-Devicesgroups. - Click Select.
- Verify Membership
- In Group1, check Members to confirm both dynamic groups are listed.
- Confirm that all San Francisco users and their devices are included via group nesting.
Exercise 2: Group 2
- Open Azure Portal
- Go to https://portal.azure.com and sign in.
- Navigate to Resource Groups
- In the left menu, select Resource groups.
- Click on AZ500RG2.
- Open Access Control (IAM)
- In the AZ500RG2 blade, select Access control (IAM) from the left menu.
- Add Role Assignment
- Click + Add > Add role assignment.
- Select Role
- In the Role dropdown, select Contributor.
- Assign Access to Group2
- In the Assign access to dropdown, select User, group, or service principal.
- Click Select members.
- Search for and select Group2.
- Click Select.
- Set Assignment Type
- Under Assignment type, select Eligible.
- For Assignment duration, choose Time-bound and specify the required start and end dates.
- Review and Assign
- Click Review + assign to complete the role assignment.
- Verify Assignment
- In Access control (IAM), go to the Role assignments tab.
- Confirm that Group2 is listed as Eligible for the Contributor role on AZ500RG2 with the specified time-bound duration.
Exercise 3: App Registration Consent
- Open Azure Portal
- Go to https://portal.azure.com and sign in.
- Navigate to Entra ID
- In the left menu, select Entra ID.
- Access User Settings
- In the Entra ID blade, select Manage > User settings.
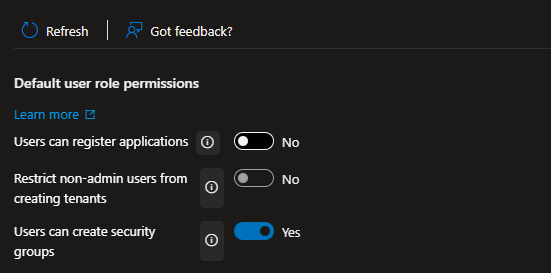
- Disable App Registrations
- Under App registrations, set Users can register applications to No.
- Block User Consent to Applications
- In the Entra ID blade, select Manage > Enterprise applications.
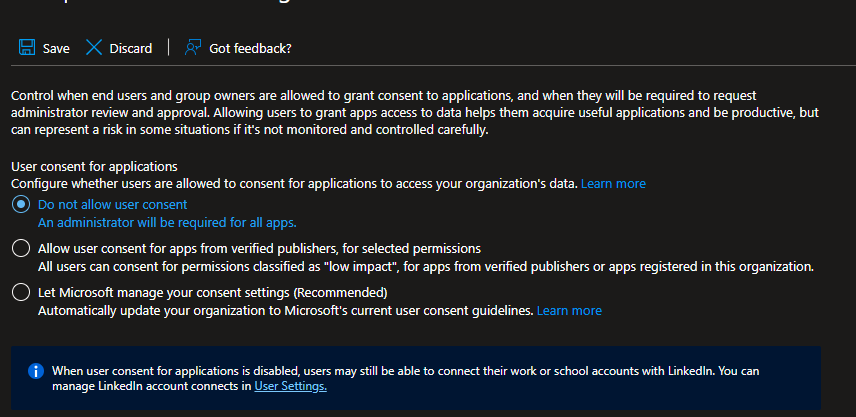
- Click Security > Consent and permissions.
- Under User consent settings, set Users can consent to apps accessing company data on their behalf to Do not allow.
- Save Changes
- Click Save after each change.
- Verify
- Try registering an app or consenting to an app as a user to confirm restrictions are enforced.
Platform Requirements
CyberPreacher LTD identifies the following platform protection requirements:
-
Microsoft Antimalware must be installed on the Virtual machines in AZ500RG1.
-
Members of Group2 must be assigned the Azure Kubernetes Service Cluster Admin Role.
-
Entra ID users must be able to authenticate to AKS1 by using their Entra ID credentials.
-
Following the implementation of the planned changes, the IT team must be able to connect to VM0 by using JIT VM access.
-
A new custom RBAC role name Role1 must be used to delegate the administration of the managed disks in AZ500RG1. Role1 must be available only for RG1
Meeting Platform Protection Requirements
1. Install Microsoft Antimalware on Virtual Machines in AZ500RG1
- Open Azure Portal
- Go to https://portal.azure.com and sign in.
- Navigate to Resource Group
- Select Resource groups > AZ500RG1.
- Select Each Virtual Machine
- Click on each VM (e.g., VM0, VM1, etc.).
- Install Antimalware Extension
- In the VM blade, select Settings > Extensions + applications > + Add.
- Search for Microsoft Antimalware.
- Click Create and configure settings as needed.
- Click Review + create > Create.
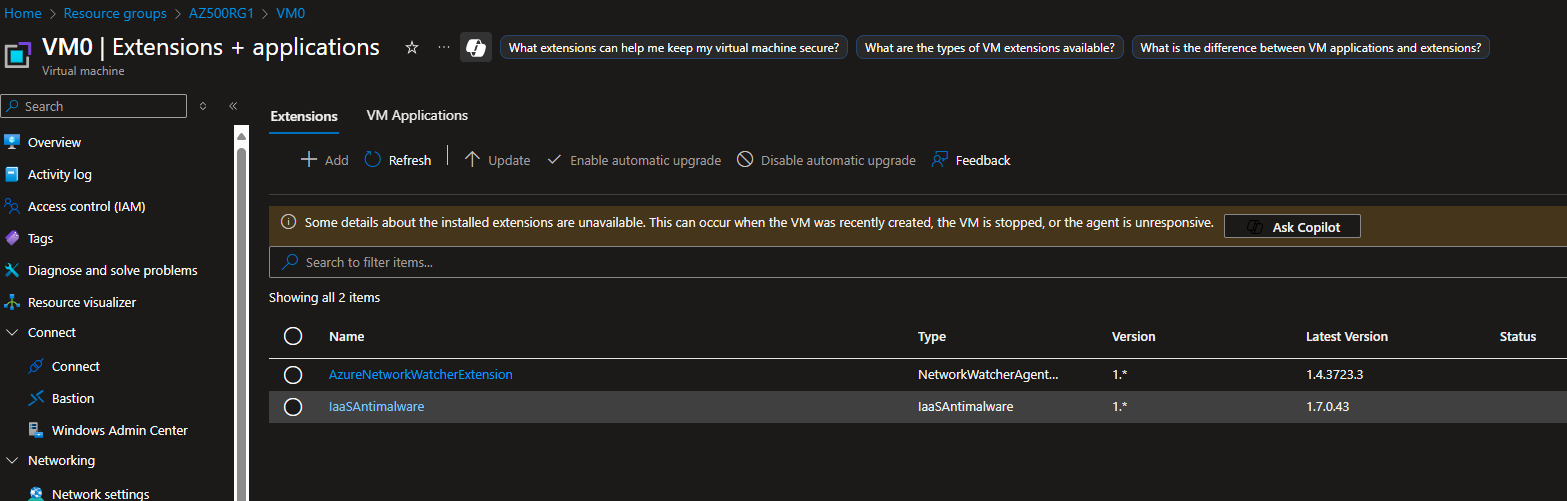
- Verify Installation
- Confirm the extension appears in the Extensions list for each VM.
- Confirm the extension appears in the Extensions list for each VM.
2. Assign Azure Kubernetes Service Cluster Admin Role to Group2
- Open Azure Portal
- Sign in and go to Resource groups > AZ500RG1.
- Navigate to AKS1
- Click on AKS1.
- Access Control (IAM)
- Select Access control (IAM).
- Add Role Assignment
- Click + Add > Add role assignment.
- Select Azure Kubernetes Service Cluster Admin Role.
- Assign to Group2.
- Click Review + assign.
- Verify Assignment
- Ensure Group2 is listed under role assignments for AKS1.

- Ensure Group2 is listed under role assignments for AKS1.
3. Enable Entra ID Authentication for AKS1
- Open AKS1 in Azure Portal
- Go to Resource groups > AZ500RG1 > AKS1.
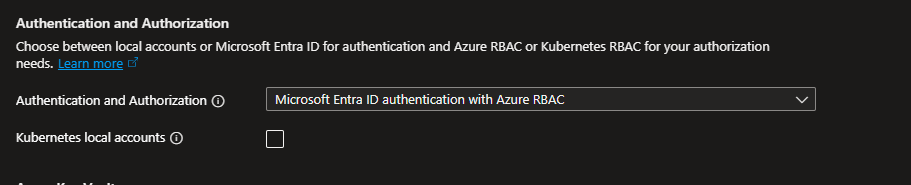
- Check Authentication Settings
- Under Settings, select Authentication.
- Ensure Entra ID integration is enabled.
- If not, click Update and enable Entra ID with Azure RBAC.
- Assign appropriate Entra ID groups for admin/user access.
- Save and Apply
- Click Save to apply changes.
- Test Authentication
- Use
az aks get-credentialsandkubectlas an Entra ID user to verify access.
- Use
4. Enable JIT VM Access for IT Team to VM0 (Your environment might not have upgraded access to this)
- Open Azure Security Center
- In the portal, search for Microsoft Defender for Cloud (formerly Security Center).
- Navigate to JIT VM Access
- Under Workload Protection, select Just-in-time VM access.
- Select VM0
- Find VM0 in the list and select it.
- Enable JIT
- Click Enable JIT on VMs.
- Configure allowed ports (e.g., RDP/SSH), source IPs, and maximum access time.
- Click Save.
- Verify
- Request JIT access and confirm IT team members can connect as expected.
5. Create Custom RBAC Role (Role1) for Managed Disks in AZ500RG1
- Define Role1 JSON
- Create a JSON file with permissions for managing disks (e.g.,
role1.json):{ "Name": "Role1", "IsCustom": true, "Description": "Custom role to manage managed disks in AZ500RG1", "Actions": [ "Microsoft.Compute/disks/*" ], "NotActions": [], "AssignableScopes": [ "/subscriptions/<subscription-id>/resourceGroups/AZ500RG1" ] }
- Create a JSON file with permissions for managing disks (e.g.,
- Upload Role in Azure Portal or CLI
- Upload the file into Azure CLI
- Use Azure CLI:
az role definition create --role-definition role1.json
- Assign Role1
- Go to AZ500RG1 > Access control (IAM) > + Add > Add role assignment.
- Select Role1 and assign to the appropriate users/groups.
- Verify
- Confirm the custom role is only available in AZ500RG1 and users can manage disks as intended.
Troubleshooting Made
To ensure users can access their VMs, you must properly configure both the Azure Firewall and the route table:
1. Configure Azure Firewall DNAT Rules
- Go to Firewall1 in the Azure Portal.
- Under Settings, select Rules > NAT rules.
- Click + Add NAT rule.
- Specify a name for the rule (e.g.,
RDP-to-VM0orSSH-to-VM0). - Set the Source addresses to the trusted public IPs or ranges.
- Set the Destination addresses to the public IP of Firewall1.
- Set the Destination ports to the required port (e.g., 3389 for RDP, 22 for SSH).
- Set the Translated address to the private IP address of the target VM.
- Set the Translated port to match the required port (e.g., 3389 or 22).
- Save and apply the NAT rule.
2. Update the Route Table
- Go to RT1 in the Azure Portal.
- Under Settings, select Routes.
- Ensure there is a route with:
- Address prefix:
0.0.0.0/0 - Next hop type: Virtual appliance
- Next hop address: Private IP of Firewall1
- Address prefix:
- Confirm RT1 is associated with Subnet0.
3. Verify Connectivity
- After updating the firewall and route table, test VM access from an allowed source.
- If access fails, review firewall rules, NSG settings, and JIT access configuration.
Tip: Always restrict access to only trusted IPs and required ports to maintain security.
Note: Delete all resources once project is completed to prevent unnecessary charges.
Side Task: Share screenshots on LinkedIn showing attack visualization and include hashtags #cloudprojectwithcyberpreacher and #CPwCP. Share your experience and learnings from this SOC lab.